Reparatur von Ledersätteln: Unterschied zwischen den Versionen
| Zeile 114: | Zeile 114: | ||
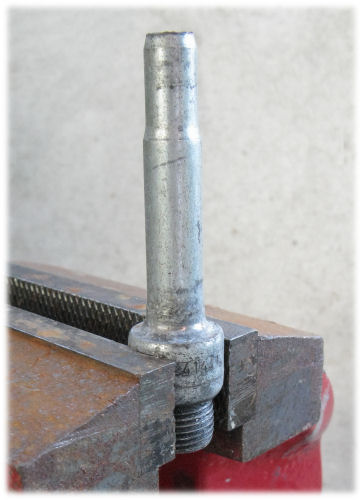
I made an anvil form an old pedal spindle. | I made an anvil form an old pedal spindle. | ||
[[Datei:Rivet anvil.jpg|center|Amboss für Sattelnieten]] | |||
This let me pound the rivets from both the inside and the outside of the saddle, to expand them inside, then form their heads. | This let me pound the rivets from both the inside and the outside of the saddle, to expand them inside, then form their heads. | ||
Version vom 5. Juli 2022, 11:32 Uhr
Dieser Artikel kann als Begleitartikel zum Artikel über Ledersättel gelesen werden. Ledersättel lassen sich anders als die meisten Kunststoffsättel reparieren. Ledersättel können drei verschiedene Typen von Defekten haben:
- Der Ledersattel wird durch Missbrauch oder einen Unfall beschädigt
- Der Unterbau kann brechen (zumeist handelt es sich um den Bruch des Sattelgestells).
- Nieten können herausfallen oder korrodieren
Jeder dieser drei Probleme sind lösbar.
Brooks repariert Sättel in seinem Unternehmenssitz in England und es gibt aktuell (im Jahr 2022) drei weitere autorisierte Brooks Reparatur-Ansprechpartner auf der ganzen Welt. Einer davon ist RTI Sports in Koblenz, die vermutlich auch Brooks Garantiebedingungen abbilden können.
Brooks verlängert die Garantiezeit, wenn man seinen Sattel online registriert. Brooks hat ein großes Lager an lieferbaren Ersatzteilen, daher ist die Reparatur auch älterer Sattelmodelle möglich, weil das grundsätzliche Design der Brooks Sättel seit Jahrzehnten unverändert geblieben ist. Reparaturen anderer marken hängen stark davon ab, wie verfügbar die Ersatzteile sind. Am Ende dieses Artikels werden einige Firmen genannt, die Sättel reparieren können.
Ein typischer Reparaturfall ist der Ersatz einer Sattelschiene. Ein Fahrradsammler oder ein Museum könnte das Leder ersetzen wollen, wenn sie ein historisches Fahrrad instand setzen. Zwei Sättel mit unterschiedlichen Defekten können zu einen guten Sattel kombiniert werden.
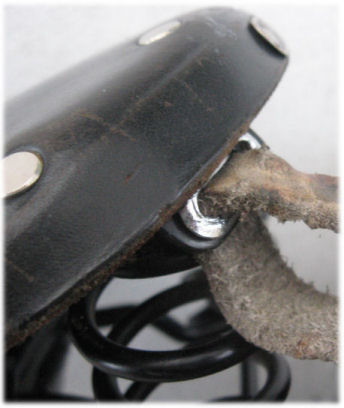
Manche ältere Brooks-Sättel haben eine Eigenschaft, die es wert ist, den Aufwand das Leder zu tauschen, auf sich zu nehmen. Sie heben Ösen für die Riemen von Satteltaschen wie sie im folgenden Bild abgebildet sind. Neuere Sättel haben Aussparungen im Sattelleder für diese Riemen. Es ist sinnvoll, diese Ösen von verschlissenen Sätteln herauszulösen und wiederzuverwenden. Brooks verkauft sie auch einzeln.
Wer macht Brooks Reparaturen?
| Deutschland | RTI Sports | ||
|---|---|---|---|
| Universitätsstraße 2 | Tel: | +49 (0) 2618 999980 | |
| 56070 KOBLENZ | Fax: | +49 (0) 2630 955230 | |
| Deutschland | Email: | info@rtisports.de | |
| Web: | https://www.rtisports.de/ | ||
| Großbritannien | Brooks | ||
| Downing Street, Smethwick | Tel: | +44 12 15 65 29 92 | |
| B66 2PA, West Midlands | Fax: | +44 12 15 65 16 30 | |
| England, UK | Email: | info@brooksengland.com | |
| Web: | https://www.brooksengland.com/en_us/special-projects.html | ||
| USA | Transport Cycles | ||
| 1901 S. 9th Street, Rm 107B | Tel: | +1 215-644-8124 | |
| Philadelphia PA 19148 | Fax: | ||
| USA | Email: | simon@transportcycle.com | |
| Web: | https://www.transportcycle.com/frame-shop/brooks-saddle-repair/ | ||
| Japan | Diatech Products | ||
| Yubinbango 612-8042 Fushimi-ku | Tel: | +81 75 622 7755 | |
| KakinokiHama cho address 431 | Fax: | +81 75 622 7766 | |
| Kyoto, Japan | Email: | info@diatechproducts.com | |
| Web: | http://www.diatechproducts.com/ | ||
Selbst durchgeführte Ledersattelreparaturen
Mit etwas heimwerklichen Geschick kann man selbst versuchen, einen Sattel zu reparieren. Manchmal ist es möglich, einen Sattel als Teilespender zu verwenden. Nachdem das Sattelgestänge eines Brooks B17 nach 30 Jahren Dauereinsatz brach, hat John Allen herausgefunden, dass ein Brooks Wright Sattel (niedrigpreisiges Modell aus den 1970er Jahren), bis auf die Oberflächenanmutung das gleiche Gestänge hatte. Er bohrte die Nieten aus dem Wright Sattel, entfernte das verzogene Leder, zog das Leder des B17 auf und hatte wieder einen perfekt funktionierenden Sattel.
Um einen Sattel auszuschlachten, benötigt man:
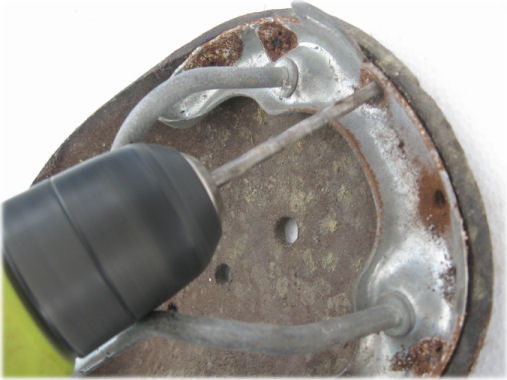
- eine elektrische Bohrmaschine und ein Bit, zum ausbohren von Nieten
- eine Körner, um eine Aussparung für den Bohrer zu schlagen, falls die Nieten keine Aussparung habe, an der man ansetzen kann
- Einen Hammer und einen flachen Körner - eine alte Pedalwelle geht auch - um die Innenseiten der Nieten flach zu klopfen; eine flache widerstandsfähige Metalloberfläche, die als Amboss dienen kann. Die flachen Oberflächen eines Schraubstocks sind gut geeignet für diese Aufgabe
Wenn man die Nieten vom Inneren des Sattels heraus ausbohret, ist es unwahrscheinlich, dass entweder das Leder oder den Unterbau des Sattels beschädigt.
Ausbohren von Nieten: Das Leder des Sattels war ausgetrocknet und rissig.
Der Unterbau des Sattels muss gereinigt werden, ist aber ansonsten einwandfrei.
Man muss nur die Nieten an der hinteren Seite des Sattels ersetzen. Der Metallschuh in der Sattelnase wird mit der Satteldecke abgehoben, wenn man die hinteren Nieten entfernt hat. Kupfernieten, die für die Sattelreparatur geeignet sind, gibt es in Bastelspezialgeschäften, online oder von Sattelreparaturgeschäften, die hier im Artikel erwähnt werden. Wenn man die großen Nieten im Inneren des Sattels flach geklopft hat, möchte man die Kanten an der Außenseite flach schlagen. Dabei hilft ein Amboss. Detailliertere Anleitungsschritte folgen.
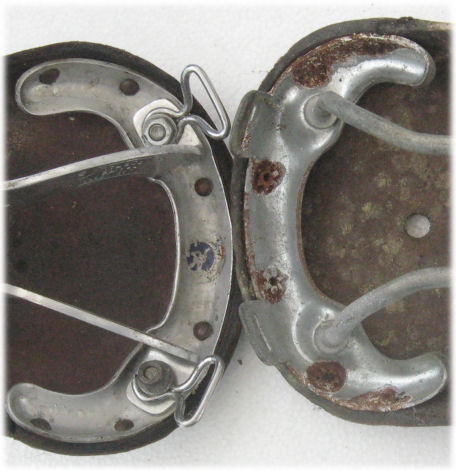
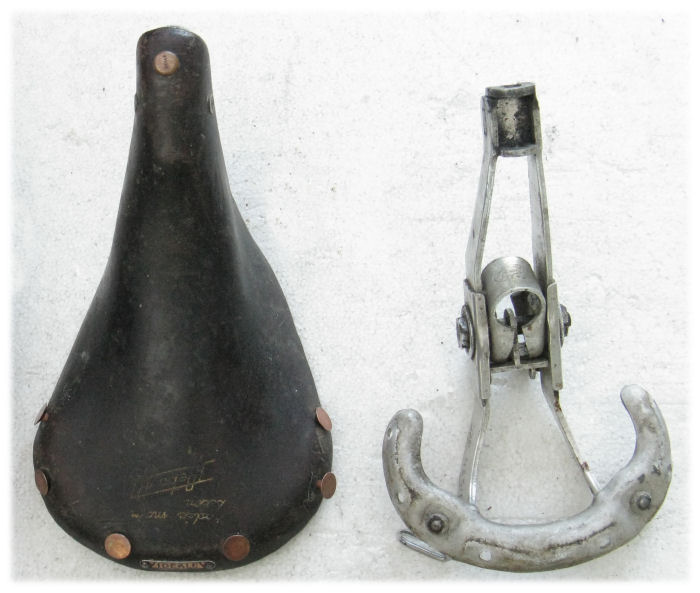
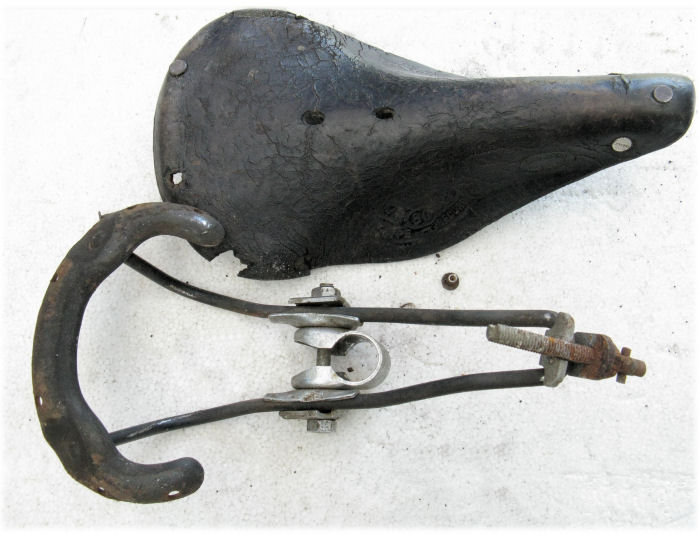
Vorzugsweise sollte man beim Ausschlachten von Sätteln und Wiederverwenden des Unterbaus darauf achten, dass die Nietenlöcher möglichst an den gleichen Stellen liegen. Falls das gerundete Metallstück am Sattelende ungefähr die gleiche Form hat, kann man dort im Metall auch neue Nietenlöcher bohren (niemals im Leder bohren). Die zwei Sättel im folgenden Bild passen nicht zusammen, weil die Breite zu unterschiedlich ist.
Eine Do-It-Yourself-Anleitung zur Sattelreparatur von Anfang bis Ende
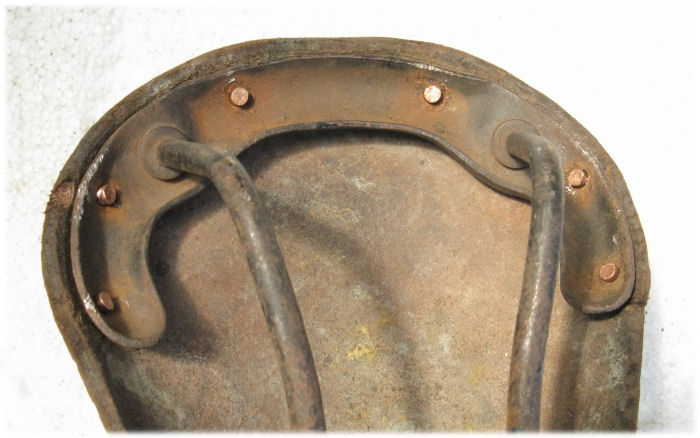
The saddle on the left in the image above is a top-of-the-line Idéale Model 92. The leather is Rodée Main Selon DRebour (broken-in by hand, using the process developed by the great bicycling illustrator Daniel Rebour). Tne aluminum undercarriage cracked around the clamp-bolt hole, and the nose of the saddle would not stay up. These saddles in good shape go for big bucks now. That is all about style and their rarity: the design is flawed. Well, steel saddle rails also do break. In the photo below, I have removed the leather and inserted new rivets.
The rivet locations and the shoe in the nose of the saddle are identical to those of an Idéale Model 80 with cracked leather that I bought for $26 on eBay. This is what happens if a leather saddle is left out in the rain for years, and never re-oiled
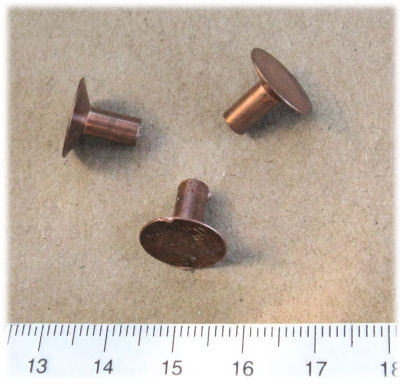
Replacement ivets should be a tight fit into the holes in the leather, and just long enough. The scale on the ruler in the photo is in centimeters. The stem of these rivets is about 3 mm or 1/8 inch thick, and about 7 mm or 3/8 inch long. See info above about sourcing rivets.
Bottom-of-the-line bottom, meet top-of-the-line top! Here, I have inserted rivets but not yet hammered on them. If I cared about style, I'd have repainted the undercarriage, or had it chromed. It has lasted for decades with no care and only surface rust. I figured that it will outlast the leather, and why bother.
Preferably assemble the front end of the saddle before installing the rivets or bolts at the rear of the saddle. Loosen the nose adjustment to make it easier to fit the rivets. If the nose assembly has come apart, see instructions lower down in this article.
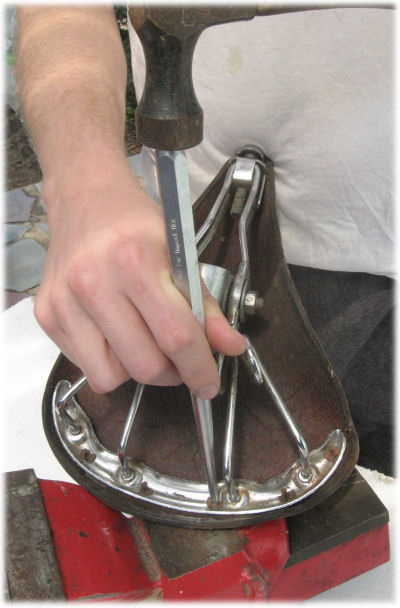
I made an anvil form an old pedal spindle.
This let me pound the rivets from both the inside and the outside of the saddle, to expand them inside, then form their heads.
Pounding rivets
TA-DA, the result! The shaping of the rivet heads could be nicer if I had a ball-peen (rounded-head) hammer and better skills, but the saddle is probably good now for as long as the leather lasts.
Finished work on saddle
Bolzen der in der Sattelnase, Gefederter Unterbau
Assembly of the front end of a saddle is a bit of mechanical puzzle, and can be confusing. Install the most common kind of slider at the side, from inside to outside, following the arrow in the photo at the left below. The "wings" of the slider should start facing downward (with the saddle upside-down). Slide the slider around to the front, rotate it into place and insert the nose bolt, with the nut ahead of the slider as shown in the photo at the right.
Getting the nose bolt into place can be difficult if the rails are in place -- though it can sometimes pop out, and if it is adjusted as loose as possible, you may be able to pry it into place with a flat-blade screwdriver, while squeezing the top of the saddle and the rails together with your other hand to tilt the metal shoe at the nose away from the bolt.
Installing clip Clip, bolt and nut installed
With a sprung saddle, you may be able to avoid working with rivets, by disassembling the undercarriage and replacing the broken parts. I did this when the rails broke on a Brooks Flyer.
My Flyer with broken rails Broken rails on Brooks Champion Flyer
When the rails break, the nose bolt and slider come loose. Let's hope that you didn't lose it them the street -- or if you did, you ordered new ones.
I had the nose bolt and slider. I was able to order a new undercarriage from Brooks. This included springs, but it is easier to undo the nuts at the lower end of the old springs and re-use them, because it is possible to turn the bolts at the lower end. Keep the extra springs as spares: springs also have been known to break.
The Flyer saddle has two sets of rails.The set which is closer to the saddle top loops around the nose bolt, as shown in the photos below.
Nose assmbly of Flyer saddle
How the nose bolt secured the upper rails
Nose assemblies may differ. The one in the image below is on a Brooks B72 4-wire saddle. It is a good idea to take a photo before disassembly, as a guide before reassembling.
N9ose of B72 saddle
Re-riveting an unsprung saddle is simple, but getting the wrench past the springs of a sprung saddle can be a bit tricky. Use a thin open-end wrench -- 1/2 inch for the Brooks saddles I've worked on. Getting a nut started is easier if you attach it to the blade of a screwdriver with a dab of grease, to reach in between the coils of a spring.
If a coil of a spring blocks a saddle's bag loop, making it hard to insert a bag strap, loosen the nuts at both top and bottom, rotate the spring, then retighten.
Sheldon strongly recommends not tightening the nose bolt. In his experience, that ruins saddles.
A leather saddle with a repaired undercarriage is as good as new -- no, better than new: it is already broken in!
Siehe auch
Also see the more general article about saddles ...and our article about leather saddles Saddles for sale at Harris Cyclery Brooks, home page Brooks, 10-year warranty registration Gilles Berthoud Lepper Rivet Cycle Works Selle Anatomica Aaron's Bicycle Repair, repair of leather saddles
Quelle
Dieser Artikel basiert auf dem Artikel Leather Bicycle Saddle Repair von der Website Sheldon Browns. Originalautor des Artikels ist John Allen.
- Wiederbelebung eine Raleigh-Twenty
- Grunderneuerung von Schraubkranzfreiläufen
- Kunstgriffe beim Messen
- Gute und schlechte Schnellspanner
- Die SRAM DualDrive Schalter und Clickbox
- Felge und Nabe messen, um Speichenlängen zu berechnen
- Sachs und SRAM Nabenschaltungen
- Betriebsanleitungen von Fahrradcomputern und GPS Geräten
- Gewindelehre
