Alles über Nabenschaltungen: Unterschied zwischen den Versionen
(Übersetzungsanfang) |
(Weiter übersetzt) |
||
| Zeile 1: | Zeile 1: | ||
Seit der ersten Dekade des 20. Jahrhunderts haben [[Nabenschaltung]]en - normalerweise Drei-Gang-Modelle - eine praktischen, zuverlässige Gangschaltungsoption für Fahrradfahrer zur Verfügung gestellt. Mit der zunehmenden Popularisierung der [[Kettenschaltung]] zu Beginn der 1970er Jahre wurden Nabenschaltungen unmodern (zumindest auf dem US-Markt). Das ist sehr unglücklich, weil für | Seit der ersten Dekade des 20. Jahrhunderts haben [[Nabenschaltung]]en - normalerweise Drei-Gang-Modelle - eine praktischen, zuverlässige Gangschaltungsoption für Fahrradfahrer zur Verfügung gestellt. Mit der zunehmenden Popularisierung der [[Kettenschaltung]] zu Beginn der 1970er Jahre wurden Nabenschaltungen unmodern (zumindest auf dem US-Markt). Das ist sehr unglücklich, weil für Gelegenheits- und Nutzfahrer Nabenschaltungen sehr zweckdienlich sind. | ||
Nabenschaltungen sind zuverlässiger als | Nabenschaltungen sind zuverlässiger als [[Kettenschaltung]]en und benötigen wesentlich weniger Wartung. Die Übersetzungssprünge der obersten Gänge machen übergroße [[Kettenblatt|Kettenblätter]] bei kleinen Laufradgrößen /zum Beispiel bei Falträdern) unnötig. Anders als bei Kettenschaltungen können Nabenschaltungen auch im Stand geschaltet werden. Das ist vor allem bei Stop-and-Go Verkehr in der Stadt sehr vorteilhaft. | ||
Nabenschaltungen sind tendenziell schwerer als Kettenschaltungssysteme und manchmal etwas ineffizienter bei manchen Gängen. Die direkte (1:1) Übersetzung im mittleren | Nabenschaltungen sind tendenziell schwerer als Kettenschaltungssysteme und manchmal etwas ineffizienter bei manchen Gängen. Die direkte (1:1) Übersetzung im mittleren gGng ist effizienter als bei Kettenschaltungen, da hier kein Zug von den Schaltwerksröllchen. Bei den meisten Nabenschaltungen kann man keine [[Schnellspanner]] einsetzen. | ||
Solltest Du Dich für ältere Fahrräder oder historische Schaltungen interessieren, schau doch einmal [[Wartung englischer Drei-Gang-Fahrräder|hier]] vorbei. | Solltest Du Dich für ältere Fahrräder oder historische Schaltungen interessieren, schau doch einmal [[Wartung englischer Drei-Gang-Fahrräder|hier]] vorbei. | ||
| Zeile 15: | Zeile 15: | ||
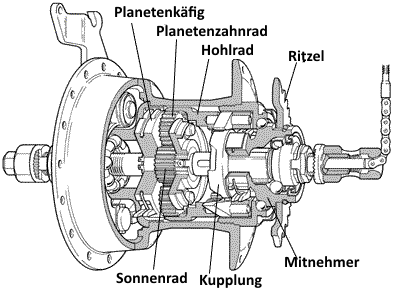
<center>''Schnittmodell einer Sturmey-Archer Nabe''</center> | <center>''Schnittmodell einer Sturmey-Archer Nabe''</center> | ||
Nabenschaltungen funktionieren nach dem Prinzip des [[Planetengetriebe]]s | |||
Die einfachen Drei-Gang-Naben haben ein einzelnes [[Sonnenrad]], das fest mit der Achse verbunden ist. Drei oder vier identische Planetenräder greifen in das Sonnenrad und rotieren um dieses herum. Die Planetenräder greifen in einen [[Zahnkranz]], der sie umgibt. Dieser hat seine Zähne innenliegend und ist sozusagen ein umgekehrtes Planetenrad. | |||
Während die mit dem [[Planetenkäfig]] verbundenen Planetenräder kreisen, umrundet der Zahnkranz vier mal und der Planetenkäfig drei Mal die Achse. (Manche Modelle haben andere Verhältnisse). | |||
* Der kleinste Gang hat ein Ritzel, dass das Zahnrad antreibt, während der Planetenkäfig die Nabe antreibt. Daher wird das Laufrad dreimal sein Zentrum umkreisen, während das Ritzel viermal sein Zentrum umkreist. Dadurch wird die [[Übersetzung]] also um 25% verringert. | |||
* Im mittleren Gang wird das Ritzel immer noch vom Zahnrad angetrieben, das wiederum direkt die Naben antreibt. Daher ist die Übersetzung direkt (1:1). Die internen Teile bleiben jederzeit in Bewegung, haben jedoch keinen Effekt im mittleren Gang. | |||
* Der höchste Gang bewegt den Antreib des Ritzels gegen den Planetenkäfig, während das Zahnrad weiter den Nabenkörper antreibt. Daher wird die Naben viermal ihr Zentrum umkreisen, während das Ritzel nur dreimal sein Zentrum umkreist. Damit wird die Übersetzung um 33% erhöht. | |||
Naben mit mehr als drei Gängen haben zwei oder drei Planetensysteme und/oder abgestufte Planetenräder mit zwei oder mehr Sätzen von Zähnen nebeneinander. Dazu gibt es einen detaillierteren Artikel von John Allen: [[Nabenschaltungstheorie]] | |||
Abgestufte Planetenräder müssen aufeinander abgestimmt sein, wenn man die Naben neu aufbaut. Die Sektionen müssen so zueinander passen, dass die Zähne ineinander greifen. Anderenfalls kann die Nabe sperren und beschädigt werden. | |||
In den späten 1990er Jahren gab es eine Art Renaissance von Nabenschaltungen als neue Sieben-Gang Naben mit großer Übersetzungsbandbreite entwickelt wurden. Seitdem hat es einiges an Fortschritten gegeben. Der Markt wird im Wesentlichen von vier Marken beherrscht, die Gangschaltungen mit bis zu 14 Gängen herstellen. Drei-Gang und Fünf-Gang Modelle werden immer noch hergestellt und bieten eine ökonomische und praktische Alternative. | |||
In | |||
==Schmierung== | ==Schmierung== | ||
Version vom 11. August 2016, 10:44 Uhr
Seit der ersten Dekade des 20. Jahrhunderts haben Nabenschaltungen - normalerweise Drei-Gang-Modelle - eine praktischen, zuverlässige Gangschaltungsoption für Fahrradfahrer zur Verfügung gestellt. Mit der zunehmenden Popularisierung der Kettenschaltung zu Beginn der 1970er Jahre wurden Nabenschaltungen unmodern (zumindest auf dem US-Markt). Das ist sehr unglücklich, weil für Gelegenheits- und Nutzfahrer Nabenschaltungen sehr zweckdienlich sind.
Nabenschaltungen sind zuverlässiger als Kettenschaltungen und benötigen wesentlich weniger Wartung. Die Übersetzungssprünge der obersten Gänge machen übergroße Kettenblätter bei kleinen Laufradgrößen /zum Beispiel bei Falträdern) unnötig. Anders als bei Kettenschaltungen können Nabenschaltungen auch im Stand geschaltet werden. Das ist vor allem bei Stop-and-Go Verkehr in der Stadt sehr vorteilhaft.
Nabenschaltungen sind tendenziell schwerer als Kettenschaltungssysteme und manchmal etwas ineffizienter bei manchen Gängen. Die direkte (1:1) Übersetzung im mittleren gGng ist effizienter als bei Kettenschaltungen, da hier kein Zug von den Schaltwerksröllchen. Bei den meisten Nabenschaltungen kann man keine Schnellspanner einsetzen.
Solltest Du Dich für ältere Fahrräder oder historische Schaltungen interessieren, schau doch einmal hier vorbei.
Wie eine Nabenschaltung funktioniert
Nabenschaltungen funktionieren nach dem Prinzip des Planetengetriebes
Die einfachen Drei-Gang-Naben haben ein einzelnes Sonnenrad, das fest mit der Achse verbunden ist. Drei oder vier identische Planetenräder greifen in das Sonnenrad und rotieren um dieses herum. Die Planetenräder greifen in einen Zahnkranz, der sie umgibt. Dieser hat seine Zähne innenliegend und ist sozusagen ein umgekehrtes Planetenrad.
Während die mit dem Planetenkäfig verbundenen Planetenräder kreisen, umrundet der Zahnkranz vier mal und der Planetenkäfig drei Mal die Achse. (Manche Modelle haben andere Verhältnisse).
- Der kleinste Gang hat ein Ritzel, dass das Zahnrad antreibt, während der Planetenkäfig die Nabe antreibt. Daher wird das Laufrad dreimal sein Zentrum umkreisen, während das Ritzel viermal sein Zentrum umkreist. Dadurch wird die Übersetzung also um 25% verringert.
- Im mittleren Gang wird das Ritzel immer noch vom Zahnrad angetrieben, das wiederum direkt die Naben antreibt. Daher ist die Übersetzung direkt (1:1). Die internen Teile bleiben jederzeit in Bewegung, haben jedoch keinen Effekt im mittleren Gang.
- Der höchste Gang bewegt den Antreib des Ritzels gegen den Planetenkäfig, während das Zahnrad weiter den Nabenkörper antreibt. Daher wird die Naben viermal ihr Zentrum umkreisen, während das Ritzel nur dreimal sein Zentrum umkreist. Damit wird die Übersetzung um 33% erhöht.
Naben mit mehr als drei Gängen haben zwei oder drei Planetensysteme und/oder abgestufte Planetenräder mit zwei oder mehr Sätzen von Zähnen nebeneinander. Dazu gibt es einen detaillierteren Artikel von John Allen: Nabenschaltungstheorie
Abgestufte Planetenräder müssen aufeinander abgestimmt sein, wenn man die Naben neu aufbaut. Die Sektionen müssen so zueinander passen, dass die Zähne ineinander greifen. Anderenfalls kann die Nabe sperren und beschädigt werden.
In den späten 1990er Jahren gab es eine Art Renaissance von Nabenschaltungen als neue Sieben-Gang Naben mit großer Übersetzungsbandbreite entwickelt wurden. Seitdem hat es einiges an Fortschritten gegeben. Der Markt wird im Wesentlichen von vier Marken beherrscht, die Gangschaltungen mit bis zu 14 Gängen herstellen. Drei-Gang und Fünf-Gang Modelle werden immer noch hergestellt und bieten eine ökonomische und praktische Alternative.
Schmierung
Older internal-gear hubs have an oil fitting on the shell. Oil lubrication generates less drag than grease and washes wear particles, dirt and water out of the mechanism. Use machine oil, not a spray lube or other thin oil. Unless a hub has sealed bearings, also use grease, to form a seal at the bearings and help keep the oil in.
The Rohloff Speedhub and the Shimano 11-speed are oil-lubricated. Other current internal-gear hubs are supplied grease-lubricated. As sold, they require periodic cleaning and replenishment of a special grease that does not make the pawls stick. Shimano sells a relubrication kit for grease-lubricated hubs. Still, many hubs are inadequately lubricated as sold, and frequent failures of grease-lubricated hubs due to water contamination have been reported in wet climates --see photos here. Better lubrication sidesteps this problem.
It is best to add oil to the lubricant regimen when rebuilding a hub, so it gets a clean start and you regrease the bearings at the same time. This is desirable even with a new hub. Follow the example shown in the photos from Aaron's Bike Repair (near the bottom of the page, after you get past the horror-show photos of rusted parts at the top). Use plenty of waterproof marine grease (as used in boat-trailer wheel bearings) for the bearing assemblies -- this keeps water out and oil in; use lightweight white lithium grease for the gears, especially with modern wide-mouth hubs that hold oil poorly; Phil Wood Tenacious Oil on the pawls and in the shell to slop around and get to where the grease didn't reach.
An internal-gear hub with a hollow axle may be re-oiled by removing the pushrod or indicator spindle and squirting oil into the end of the axle. The SRAM i-Motion 9-speed, disk brake model, can be oiled through a disk brake rotor hole. Plug all the holes with machine screws between oilings. On a hub which doesn't allow one of these tricks, you could install a Sturmey-Archer oil cap. Tools: #3 (or 5.5 mm) drill and a 1/4 inch 28 TPI tap. A simpler but less convenient approach is to unscrew the left bearing cone and squirt oil in past the left end of the axle.
Oil can accumulate on the hub shell, and can become a bit messy, but, big deal. On the other hand, if used to excess, oil can run down the spokes onto the rim, soften the brake shoe rubber and make a rim brake squeal and grab. This is hazardous in a front wheel, but the internal-gear hub is in the rear wheel. Cleaning the oil and brake-shoe rubber deposits off the rim restores brake function. Also, it is best to store your bicycle in an unheated (but dry) area. When you take it out from a heated area in cool, moist -- or wet -- weather, the air inside the hub contracts, pulling in moisture. If you must store your bike in a heated area, be especially careful about keeping the hub oiled.
Old Sturmey-Archer coaster-brake 3-speeds have an oil fitting, but other hubs with a coaster brake require a special high-temperature grease for the brake shoes. Some hubs use a different grease for the rest of the mechanism, so the pawls don't stick. A coaster brake in an internal-gear hub is, all in all, a poor idea because of the wear particles it generates, and because you can't use oil lubrication.
Oil lubrication may cause problems with a drum brake, by seeping out past the bearing and contaminating the brake shoes. Phil Wood Tenacious Oil stays in place better than most other oils. Unlike with derailleur bicycle, if you must store or transport the bike horizontally, lay it on its right side. This will prevent oil from leaking into the drum. Place something under the rear wheel to catch the drip, especially if you have just oiled the hub.
Shimano Rollerbrakes supplied with internal-gear hubs are outside the hub shell, avoiding the contamination problem. These use steel brake shoes inside a steel drum and require periodic lubrication with high temperature grease.
Einstellen der Kette
Internal-gear hubs typically use a single sprocket and single chainwheel. The chain is held in place by moving the hub's axle forward or backward in the dropout slots until the chain is just barely slack. Details of how to do this are in another article on this site. A bicycle with vertical dropouts must have an eccentric bottom bracket, or a chain tensioner must be installed.
As the chain wears, it lengthens, and it is more likely to fall off. It must be readjusted periodically. Technique for chain adjustment is described in the article on fixed-gear bicycles.
Sicherungsscheiben
The axle is part of the gear train of an internal-gear hub. You can check this out for yourself. If you hold the hub shell or rim when the hub is not installed on the bicycle and turn the sprocket, the axle also turns -- backwards if the hub's drive ratio is lower than 1:1, forwards if higher.
With most hubs, special anti-rotation washers keep the axle from turning when the wheel is installed on the bicycle. These washers engage flat surfaces on the axle, and have tabs that fit into the dropout slots. Different washers fit different models of hubs and dropout slot widths. Many newer hubs attach the shifter cable to a pulley that rotates around the hub's axle, between the right dropout and the sprocket. Depending on whether a bicycle has horizontal, vertical or reversed (track) dropouts, different washers are needed so the shift cable can approach from the front of the bicycle. Follow the instructions for each hub.
A hub brake of any kind also must resist rotation. Brakes on internal-gear hubs use a reaction arm for this purpose, separate from the anti-rotation washer(s) for the gearing. You must install them too. The Rohloff internal-gear hub has such a wide gear range that some models use a reaction arm and others, an attachment to disk-brake tabs.
On a bicycle with rear suspension, the suspension's pivot is usually ahead of the rear hub. Because it tries to rotate the hub's axle, an internal-gear hub lifts the rear end of the bicycle, in gears below 1:1; the opposite in gears above 1:1. The resulting "pogo-sticking" reduces pedaling efficiency, to a degree which depends on the design of the suspension and the gear selection.
Ritzel und Kettenblätter auswählen
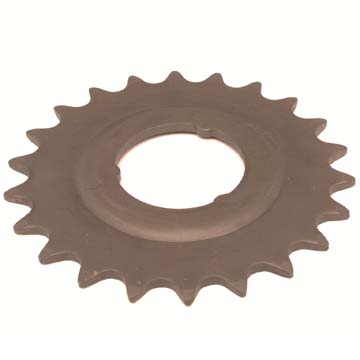
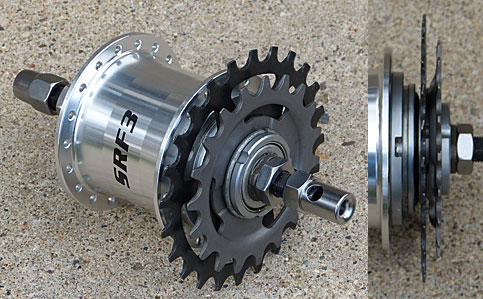
By selecting an appropriate-sized sprocket and chainwheel, the overall range of any internal-gear hub can be raised or lowered by any desired amount. Most current internal-gear hubs take 3-splined sprockets with 1 3/8 inch inside diameter, interchangeable among brands. These sprockets are available from various sources from 13-24 teeth, though some hubs can't accept the smallest sprockets.
The Rohloff uses a special threaded sprocket; the SRAM i-Motion 9, G8 and G9 hubs and Sturmey-Archer 8-speeds use proprietary lugged sprockets; a few Sturmey-Archer models have 9 splines like a Shimano Freehub. Model numbers for these hubs end in "(N)".
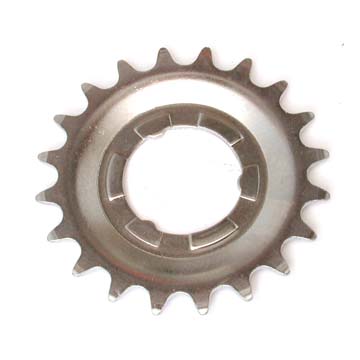
Many of the common 3-lug sprockets are made for 1/8" chain -- wider than the chain used with derailer gearing. The wider chain can be used with thin chainwheels made for use with derailers, though special track chainwheels have teeth that are both taller and wider, and allow the chain to become looser before it could fall off. 3-lug sprockets for derailer chain are sold, stamped with raised sections around the hole so they fit the hub the same way as thicker sprockets. With the narrower sprockets, use chain made for a 7-speed or 8-speed derailer system.
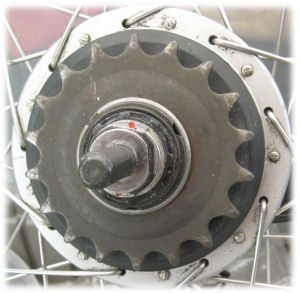
The sprocket of most internal-gear hubs is held in position by a spring circlip (snap ring). The circlip can be pried off with a thin flat-blade screwdriver, and the sprocket can then be lifted off. Most sprockets made for this system (including those shown above) are "dished" so you can adjust the chainline by flipping the sprocket over. The circlip snaps on, also most easily by levering it into position with a flat-blade screwdriver. Some hubs will accept a smaller sprocket dished outward than inward, due to interference problems. Some hubs, have one or two spacer washers in addition to the sprocket. Changing the order in which the spacer washer(s) and sprocket are installed on the hub can adjust the chainline.
Except with a fixed-gear or coaster-brake hub, it is possible to double the useful life of a 3-lug sprocket by flipping it over so the wear is on the other side of the teeth -- as long as you can achieve a good chainline.
After re-installing the sprocket, it is a good idea to seat the circlip by going around it and tapping it lightly with a hammer and punch. This is especially important on a hub with a coaster brake, because the brake will fail if the sprocket slips off.
It is also fairly easy to modify any Shimano cassette sprocket that doesn't have a built-in spacer. These are available from 14-34 teeth. Shimano cassette sprockets have the same internal diameter as those used with internal gear hubs, but have 9 splines instead of 3. With a suitable grinder, 6 of the splines need to be removed, and the corners of the remaining three rounded off. A thin spacer washer may also be needed, because the cassette sprockets are a bit thinner than the stock sprockets. On a Sturmey-Archer (N) hub, you may use an unmodified Shimano Freehub sprocket, but you may still need the spacer washer.
You may also adjust the gear range by changing the chainwheel, though that is usually more expensive than changing the sprocket. If you install a larger sprocket or chainwheel, you also will need a longer chain.
Some internal-gear hubs also are available with Gates Carbon Drive belt drive. This has proven to be reliable but has its own special issues. In particular, chainline -- well, beltline -- is more critical than with a chain, and the belt must always be slack when removing and installing it. Levering it off the side of a sprocket will damage it, leading quickly to failure.
Go to Sheldon's Gear Calculator to scope out the possibilities. John Allen's table of internal-gear hub ratios allows you compare ratios of the different hubs.
Drei Gänge
All current three-speeds except for the Sturmey-Archer S3X fixed-gear hub have a wide range, with big steps between all of the gears. The way bicycle manufacturers commonly set up three-speeds, the middle gear is too low for level-ground riding, to keep the top gear from being completely useless. A 3-speed hub will serve you much better if you install a larger rear sprocket or smaller chainwheel, and use the top gear on level terrain. The low and middle gears are then better for acceleration and climbing. If you spin out on downhills, then you can coast.
Sheldon disparaged coasting, but really, occasional coasting is better than struggling up hills and having no level-ground gear! The top gear with a 3-speed should usually be in the range between 70 and 80 gear inches (5.6 and 6.4 meters development, 5.0 to 6.0 gain ratio), depending on your strength and pedaling style -- say, a 46-tooth chainring and 22-tooth sprocket with a 26-inch rear wheel. If the terrain where you ride is all up and down, with little or no level ground, you may want even lower gears than that. Clip-in pedals or toeclips and straps (practical only without a coaster brake) help you pedal at a higher cadence, so your power range is wider -- an advantage on any bicycle but more so on one with big steps between gears.
Fünf bis Acht Gänge
An internal-gear hub with 5 through 8 speeds generally works best if your level-ground gear is the second-highest gear, around 70 gear inches (5.6 meters development, 5.0 gain ratio, more or less depending on your strength and pedaling style). You will then have one higher gear for downhill riding or tailwinds. If you ride where there are no steep climbs, you may want the third-highest gear of a 7 or 8-speed hub to be the level-ground gear, so you don't spin out when you have a strong tailwind. All current 5-speed hubs have enough range for smart acceleration in urban riding. Hubs with 7 or 8 speeds also offer lower gears for climbing, and generally, smaller steps between gears.
Neun und mehr Gänge
If a hub has 9 or more speeds, you generally want to the level-ground gear to be the third-highest. Again, as with the hubs with fewer speeds, this depends on terrain.
Hybridschaltung
Hybrid gearing uses an internal-gear hub along with derailer gearing. Sturmey-Archer and SRAM make 3-speed hubs with splines for an 8- 9- or 10-sprocket cassette. These hubs are especially useful on bicycles which can't take a front derailer, and on small-wheel bicycles, where the hub's step-up top gear makes an oversized chainwheel unnecessary.
The stock cassettes sold with SRAM hybrid-gearing systems work OK, but I like other combinations better. The stock Shimano CS‑HG50‑8 8-speed cassette, 11-13-15-17-19-21-24-28, works well with a small wheel. On the older Sachs 3x7 system with the short 7-speed cassette body, the Shimano M cassette, 13-15-17-19-21-24-28, or the D or F cassette, 14-16-18-21-24-28-32 is good, or an 8 of 9 on 7 leaving off the smallest sprocket of a stock Shimano XT or XTR cassette -- 12-14-16-18-21-24-28-32. To use the 8 of 9-speed combinations, you need an 9-speed chain and an 9-speed shifter (or 8-speed shifter with alternate cable routing). It is also possible to build up a custom combination. Good 9-speed custom combinations are 13-15-17-19-21-23-25-28-32 and 11-13-15-17-19-21-24-28-32.
With any of these hybrid gearing systems, choose the chainwheel so the smallest sprocket and the hub's direct-drive middle gear give about 75 gear inches (6.0 meters development, 5.5 gain ratio). This is typically your level-ground cruising-along gear -- it could be a bit higher or lower depending on your strength. It is best to avoid using a very small sprocket, which will wear quickly -- though on a small-wheel bicycle, it may be more practical just to count on replacing the sprocket frequently, to avoid having to use an oversize chainwheel. Use all of the sprockets with the hub in its most efficient, direct-drive middle gear. Shifting the hub to the low or high gear gives you a couple of additional ratios at the top and bottom of the range, or a quick downshift as needed in urban traffic.
With any freewheeling internal-gear hub, you can have hybrid gearing using double or triple chainwheels. You must then also use a spring-loaded chain tensioner, which could be a rear derailer without a shifter and cable. In this way, you get to enjoy the quick shifting of the internal-gear hub in a hilly city such as San Francisco, and also have "bail-out" gears. Many hubs have splines wide enough that you could install two sprockets and shift them with a rear derailer. 13 and 15 teeth or 18 and 21 teeth split the wide steps of a three-speed nicely in half. Use derailer chain, and sprockets made for it. Use a modified Shimano cassette sprocket (see instructions) for the inner of the two. For the outer, use a dished sprocket also made for derailer chain. Such sprockets are usually stamped, like the one below, to fit in the space for a 1/8" sprocket. You may need to grind down the projections on the outward-dished side of the sprocket so you can fit all the necessary parts onto the hub's splines. With only two sprockets and/or two chainwheels, shifting is indexed even if the shifters are not!
Some internal-gear hubs are not rated for the stresses from extremely steep climbs and a heavy load, a potential problem with do-it-yourself hybrid gearing. Usually, manufacturers rate hubs in terms of the acceptable chainwheel/sprocket ratio, but this rating really amounts only to "we will make it so hard to pedal that you will get off and walk." Pushing a lower gear up the same hill actually stresses the hub less. A small rear wheel and smooth pedaling reduce stress on the hub.
Siehe auch
Note, 2-speeds of all kinds are covered on our coaster-brake page, though some are brakeless. Rohloff SRAM/Sachs Shimano Sturmey-Archer 14-speed All 3-speed 3-speed 4-speed 4 and 5-speed 5-speed G8, G9: 8 and 9-speed 7-speed 7-speed i_motion 9: 9-speed 8-speed 8-speed 12-speed 11-speed hybrid
Quelle
Dieser Artikel basiert auf dem Artikel Internal-Gear Hubs von der Website Sheldon Browns. Originalautor des Artikels ist Sheldon Brown - Ergänzungen von John Allen.
